扩容新群组
标签:Pro版区块链网络 扩容群组
Pro版本FISCO BCOS区块链系统支持动态多群组区块链网络,可在系统运行时扩容产生新群组、下线群组。BcosBuilder
提供了新群组上线和下线功能,本章在搭建Pro版区块链网络的基础上扩容、下线群组group2,帮助用户掌握Pro版本FISCO
BCOS区块链系统群组扩容、下线步骤。
注解
扩容新群组前,请参考 这里 搭建Pro版区块链网络
1. 扩容新群组
这里以在IP为172.25.0.3的机器(容器)中扩容2个链ID为chain、群组ID为group2的区块链节点为例介绍新群组扩容。
1.1 设置新群组配置
注解
实际操作过程中,须将tars token替换为从tars网页管理平台【admin】->【用户中心】->【token管理】获取可用的token。
扩容新群组可直接使用服务部署配置模板conf/config-deploy-example.toml,配置其群组ID为group2,具体如下:
macOS系统:
# 进入操作目录
$ cd ~/fisco/BcosBuilder/pro

# 拷贝配置文件
$ cp conf/config-deploy-example.toml config.toml

# 配置tars token: 可通过tars网页管理平台的【admin】->【用户中心】->【token管理】获取可用的token
# 这里的token为:eyJhbGciOiJIUzI1NiIsInR5cCI6IkpXVCJ9.eyJ1aWQiOiJhZG1pbiIsImlhdCI6MTYzODQzMTY1NSwiZXhwIjoxNjY3MjAyODU1fQ.430ni50xWPJXgJdckpOTktJB3kAMNwFdl8w_GIP_3Ls
$ sed -i .bkp 's/tars_token = ""/tars_token = "eyJhbGciOiJIUzI1NiIsInR5cCI6IkpXVCJ9.eyJ1aWQiOiJhZG1pbiIsImlhdCI6MTYzODQzMTY1NSwiZXhwIjoxNjY3MjAyODU1fQ.430ni50xWPJXgJdckpOTktJB3kAMNwFdl8w_GIP_3Ls"/g' config.toml

# 配置群组ID
$ sed -i .bkp 's/group0/group2/g' config.toml

# 确认群组ID修改成功: 输出group2
$ cat config.toml | grep -i group_id
group_id="group2"
linux系统:
# 进入操作目录
$ cd ~/fisco/BcosBuilder/pro
# 拷贝配置文件
$ cp conf/config-deploy-example.toml config.toml

# 配置tars token: 可通过tars网页管理平台的【admin】->【用户中心】->【token管理】获取可用的token
# 这里的token为:eyJhbGciOiJIUzI1NiIsInR5cCI6IkpXVCJ9.eyJ1aWQiOiJhZG1pbiIsImlhdCI6MTYzODQzMTY1NSwiZXhwIjoxNjY3MjAyODU1fQ.430ni50xWPJXgJdckpOTktJB3kAMNwFdl8w_GIP_3Ls
$ sed -i 's/tars_token = ""/tars_token = "eyJhbGciOiJIUzI1NiIsInR5cCI6IkpXVCJ9.eyJ1aWQiOiJhZG1pbiIsImlhdCI6MTYzODQzMTY1NSwiZXhwIjoxNjY3MjAyODU1fQ.430ni50xWPJXgJdckpOTktJB3kAMNwFdl8w_GIP_3Ls"/g' config.toml

# 配置群组ID
$ sed -i 's/group0/group2/g' config.toml

# 确认群组ID修改成功: 输出group2
$ cat config.toml | grep -i group_id
group_id="group2"
新群组group2的配置config.toml如下:
[chain]
chain_id="chain0"

[[group]]
group_id="group2"
# the genesis configuration path of the group, will generate new genesis configuration if not configurated
# genesis_config_path = ""
# VM type, now only support evm/wasm
vm_type = "evm"
# use sm-crypto or not
sm_crypto=false
# enable auth-check or not
auth_check=false
init_auth_address=""

# the genesis config
# the number of blocks generated by each leader
leader_period = 1
# the max number of transactions of a block
block_tx_count_limit = 1000
# consensus algorithm now support PBFT(consensus_type=pbft)
consensus_type = "pbft"
# transaction gas limit
gas_limit = "3000000000"
# compatible version, can be dynamically upgraded through setSystemConfig
# the default is 3.0.0
compatibility_version="3.0.0"

[[agency]]
name = "agencyA"
# enable data disk encryption for rpc/gateway or not, default is false
enable_storage_security = false
# url of the key center, in format of ip:port, please refer to https://github.com/FISCO-BCOS/key-manager for details
# key_center_url =
# cipher_data_key =

    [[agency.group]]
        group_id = "group0"
        [[agency.group.node]]
        node_name = "node0"
        deploy_ip = "172.25.0.3"
        # enable data disk encryption for bcos node or not, default is false
        enable_storage_security = false
        # url of the key center, in format of ip:port, please refer to https://github.com/FISCO-BCOS/key-manager for details
        # key_center_url =
        # cipher_data_key =
        monitor_listen_port = "3902"
        # monitor log path example:"/home/fisco/tars/framework/app_log/"
        monitor_log_path = ""

[[agency]]
name = "agencyB"
# enable data disk encryption for rpc/gateway or not, default is false
enable_storage_security = false
# url of the key center, in format of ip:port, please refer to https://github.com/FISCO-BCOS/key-manager for details
# key_center_url =
# cipher_data_key =

    [[agency.group]]
        group_id = "group0"

        [[agency.group.node]]
        node_name = "node0"
        deploy_ip = "172.25.0.3"
        # enable data disk encryption for bcos node or not, default is false
        enable_storage_security = false
        # url of the key center, in format of ip:port, please refer to https://github.com/FISCO-BCOS/key-manager for details
        # key_center_url =
        # cipher_data_key =
        monitor_listen_port = "3901"
        # monitor log path example:"/home/fisco/tars/framework/app_log/"
        monitor_log_path = ""
1.2 扩容新群组
# 进入操作目录
cd ~/fisco/BcosBuilder/pro

# 部署新群组
python3 build_chain.py chain -o deploy -t node
执行上述命令后,当脚本输出deploy all nodes of the given group success时,则说明区块链节点扩容新群组成功,详细日志输出如下:
=========================================================
----------- generate config for all nodes -----------
----------- generate genesis config for group group2 -----------
* generate pem file for agencyAgroup2node0BcosNodeService
	- pem_path: ./generated/chain0/group2/agencyAgroup2node0BcosNodeService/node.pem
	- node_id_path: ./generated/chain0/group2/agencyAgroup2node0BcosNodeService/node.nodeid
	- node_id: 721c2502ceb5a4c3017bfe41bd96c4be3229e4f65061879620fce2841dcc8ebe66438b0d8b8da0cf914493a7d7b9afb8c0b383c85c84a847180092d1d4661d63

	- sm_crypto: 0
* generate pem file for agencyBgroup2node0BcosNodeService
	- pem_path: ./generated/chain0/group2/agencyBgroup2node0BcosNodeService/node.pem
	- node_id_path: ./generated/chain0/group2/agencyBgroup2node0BcosNodeService/node.nodeid
	- node_id: 8aeeac84516ac678e9261a5acb8a509f9fce9e00986630975c6c48710640d8ff0c2460a9f321f0e412325ef55d80e59b418b6f376a26a0afe0a01fea22f7afe2

	- sm_crypto: 0
* generate_genesis_config_nodeid
* consensus_type: pbft
* block_tx_count_limit: 1000
* leader_period: 1
* gas_limit: 3000000000
* compatibility_version: 3.0.0
* generate_genesis_config_nodeid success
* store genesis config for chain0.group2
	 path: generated/chain0/group2/config.genesis
* store genesis config for chain0.group2 success
* store genesis config for agencyAgroup2node0BcosNodeService
	 path: ./generated/chain0/group2/agencyAgroup2node0BcosNodeService/config.genesis
* store genesis config for agencyAgroup2node0BcosNodeService success
* store genesis config for agencyBgroup2node0BcosNodeService
	 path: ./generated/chain0/group2/agencyBgroup2node0BcosNodeService/config.genesis
* store genesis config for agencyBgroup2node0BcosNodeService success
----------- generate genesis config for group2 success -----------
----------- generate ini config for group group2 -----------
* store ini config for agencyAgroup2node0BcosNodeService
	 path: ./generated/chain0/group2/agencyAgroup2node0BcosNodeService/config.ini
* store ini config for agencyAgroup2node0BcosNodeService success
* store ini config for agencyBgroup2node0BcosNodeService
	 path: ./generated/chain0/group2/agencyBgroup2node0BcosNodeService/config.ini
* store ini config for agencyBgroup2node0BcosNodeService success
----------- generate ini config for group group2 success -----------
----------- generate config for all nodes success -----------
deploy services for all the group nodes
deploy service agencyAgroup2node0BcosNodeService
deploy service agencyAgroup2node0BcosNodeService success
deploy service agencyBgroup2node0BcosNodeService
deploy service agencyBgroup2node0BcosNodeService success
=========================================================
群组扩容过程中生成的区块链节点相关的配置位于generated/${chainID}/${groupID}目录,具体如下:
$ tree generated/chain0/group2
generated/chain0/group2
├── agencyAgroup2node0BcosNodeService
│   ├── config.genesis
│   ├── config.ini
│   ├── node.nodeid
│   └── node.pem
├── agencyBgroup2node0BcosNodeService
│   ├── config.genesis
│   ├── config.ini
│   ├── node.nodeid
│   └── node.pem
└── config.genesis
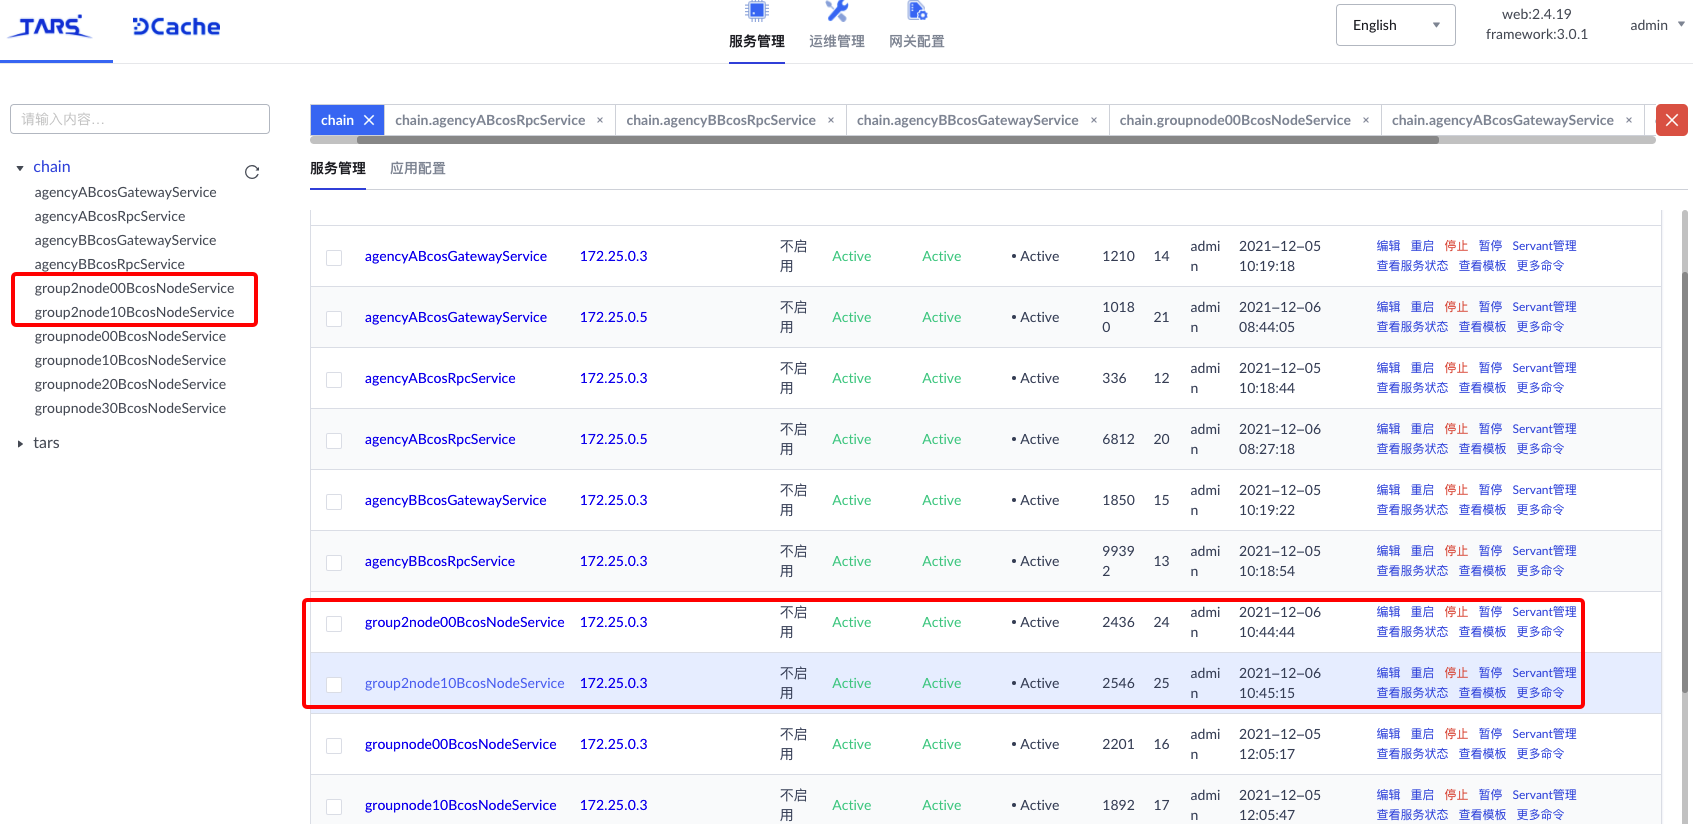
新群组扩容成功后,可在tars网页管理平台看到新增的区块链服务agencyAgroup2node0BcosNodeService和agencyBgroup2node0BcosNodeService:
2. 向新群组发送交易
新群组部署成功后,可使用控制台直接连接新群组group2,向新群组发送交易。
$ bash start group2
=============================================================================================
Welcome to FISCO BCOS console(3.1.0)!
Type 'help' or 'h' for help. Type 'quit' or 'q' to quit console.
 ________ ______  ______   ______   ______       _______   ______   ______   ______
|        |      \/      \ /      \ /      \     |       \ /      \ /      \ /      \
| $$$$$$$$\$$$$$|  $$$$$$|  $$$$$$|  $$$$$$\    | $$$$$$$|  $$$$$$|  $$$$$$|  $$$$$$\
| $$__     | $$ | $$___\$| $$   \$| $$  | $$    | $$__/ $| $$   \$| $$  | $| $$___\$$
| $$  \    | $$  \$$    \| $$     | $$  | $$    | $$    $| $$     | $$  | $$\$$    \
| $$$$$    | $$  _\$$$$$$| $$   __| $$  | $$    | $$$$$$$| $$   __| $$  | $$_\$$$$$$\
| $$      _| $$_|  \__| $| $$__/  | $$__/ $$    | $$__/ $| $$__/  | $$__/ $|  \__| $$
| $$     |   $$ \\$$    $$\$$    $$\$$    $$    | $$    $$\$$    $$\$$    $$\$$    $$
 \$$      \$$$$$$ \$$$$$$  \$$$$$$  \$$$$$$      \$$$$$$$  \$$$$$$  \$$$$$$  \$$$$$$

=============================================================================================

# 获取当前群组列表
[group2]: /> getGroupList
["group", "group2"]

# 获取群组2的区块链节点NodeID列表
[group2]: /> getGroupPeers
peer0: 93d51a1a3af71dda7015d7be88818ef4f3e674cd0681e8184690ac0f504aee1148023eda30e3075958accda62e35161f42312ed4b56f44e23ae2e81c07734c60
peer1: a6448fd526eb90438621d653e59cd2c850cf60953cdf702471e62731b4363412f05319f92aa141c38031d9bf1d3d2067e5430585cfe8f38d74ebc20e6dacf9b3


# 部署hello_world合约
[group2]: /> deploy HelloWorld
transaction hash: 0x796b573aece250bba891b9251b8fb464d22f41cb36e7cae407b2bd0a870f5b72
contract address: 0x6849F21D1E455e9f0712b1e99Fa4FCD23758E8F1
currentAccount: 0x7b047472a4516e9697446576f8c7fcc064f967fa

# 获取当前块高
[group2]: /> getBlockNumber
2

# 调用tmp2目录下hello_world合约的get方法是,输出Alice
[group2]: /> call HelloWorld 0x6849F21D1E455e9f0712b1e99Fa4FCD23758E8F1 get
---------------------------------------------------------------------------------------------
Return code: 0
description: transaction executed successfully
Return message: Success
---------------------------------------------------------------------------------------------
Return value size:1
Return types: (string)
Return values:(Hello, World!)
---------------------------------------------------------------------------------------------

# 设置hello_world的name为"Hello, Fisco"
[group2]: /> call HelloWorld set "Hello, Fisco"
transaction hash: 0x2f7c85c2c59a76ccaad85d95b09497ad05ca7983c5ec79c8f9d102d1c8dddc30
---------------------------------------------------------------------------------------------
transaction status: 0
description: transaction executed successfully
---------------------------------------------------------------------------------------------
Receipt message: Success
Return message: Success
Return value size:0
Return types: ()
Return values:()
---------------------------------------------------------------------------------------------
Event logs
Event: {}

# 获取更新后的name
[group2]: /> call HelloWorld get
---------------------------------------------------------------------------------------------
Return code: 0
description: transaction executed successfully
Return message: Success
---------------------------------------------------------------------------------------------
Return value size:1
Return types: (string)
Return values:(Hello, Fisco)
---------------------------------------------------------------------------------------------

# 获取当前块高
[group2]: /> getBlockNumber
3
3. 下线群组
BcosBuilder也提供了新群组下线功能,进行群组下线操作前,请确保群组已经不再会被使用。
下线群组group2的步骤如下:
# 进入操作目录
cd ~/fisco/BcosBuilder/pro

# 下线群组group2: 须保证config.toml是群组group2扩容时使用的配置文件
python3 build_chain.py chain -o undeploy -t node
执行上述命令后,当脚本输出undeploy all nodes of the given group success时,则说明区块链节点下线新群组成功,详细日志输出如下:
=========================================================
----------- undeploy all nodes of the given group -----------
undeploy services for all the group nodes
undeploy service agencyAgroup2node0BcosNodeService
undeploy service agencyAgroup2node0BcosNodeService success
undeploy service agencyBgroup2node0BcosNodeService
undeploy service agencyBgroup2node0BcosNodeService success
----------- undeploy all nodes of the given group success -----------
=========================================================
此时通过控制台,无法查询到下线群组group2的信息:
$ bash start.sh
# 获取当前群组列表
[group0]: /> getGroupList
["group"]